A youth baseball cap has one job before it ever carries a logo: it has to fit a child’s head through a season of growth, sweat, and being crushed into the bottom of a bat bag. Fit is the first specification you lock down, not the last. Get it right and the embroidery sits square over the brow and the cap stays put through a headfirst slide into second. Get it wrong and you are reordering half your sizes by July. This walkthrough covers how to measure, how to translate that number into the right size, and the handful of construction and decoration choices that decide whether a custom team order fits the whole roster.
Measure the head, not the birthday
Age is a proxy, and a poor one. Two nine-year-olds can sit a full inch apart in head circumference, and an inch is the difference between a cap that grips and one that slides down over the eyes on a ground ball. So measure. Wrap a soft tailor’s tape (or a length of string you then hold against a ruler) around the largest part of the head, about one finger-width above the eyebrows and around the widest point above the ears. Keep it snug rather than tight, and record the number in inches or centimeters. For a team, collect every player’s measurement on one sheet before you order anything. It takes ten minutes at the end of a practice and it is the single best insurance against a reorder.
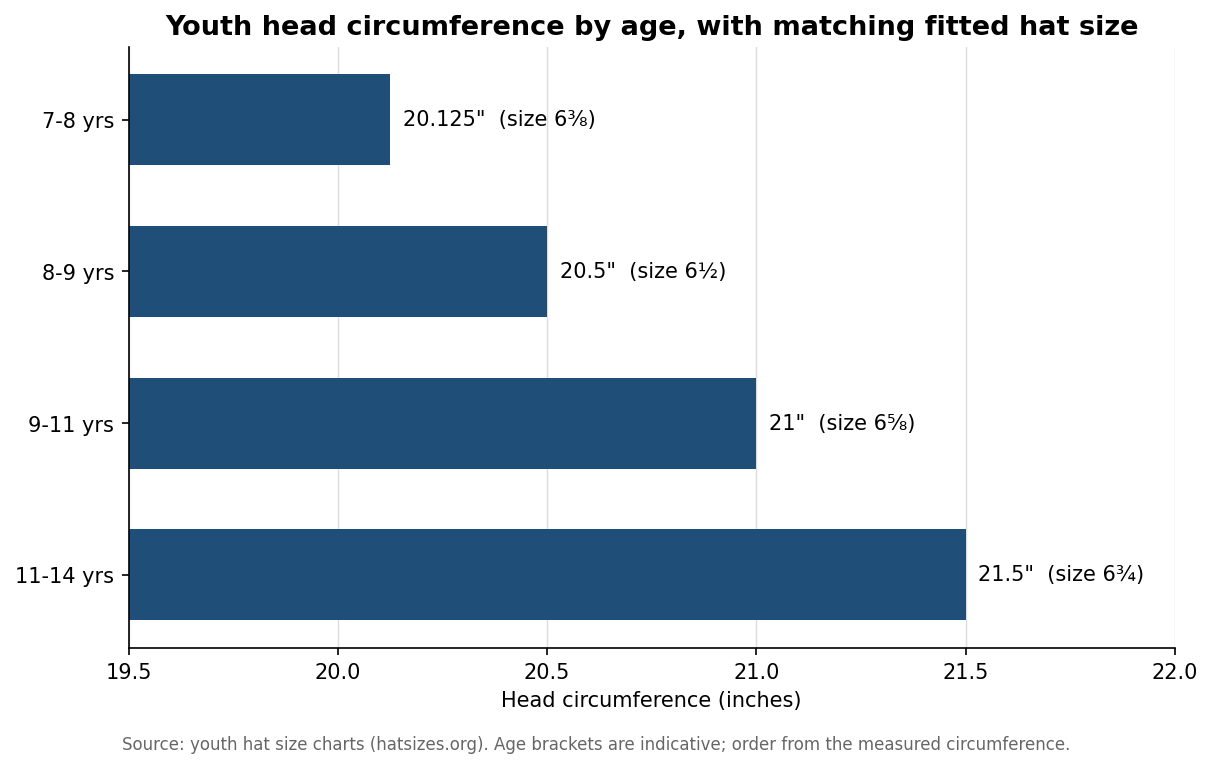
As a reference point, youth head circumference generally runs from about 20⅛ inches (51 cm) around ages seven to eight up to roughly 21½ inches (54.6 cm) by ages eleven to fourteen, which maps to fitted sizes of about 6⅛ through 6¾. Treat the age brackets as indicative only. The measured circumference is the number you actually order from, and where a child falls between two sizes you round up.
Match the number to a size band
Once you have circumferences in hand, group them against the sizing system your chosen cap actually uses, because the systems are not interchangeable. Fitted caps use numbered sizes (6⅛, 6½, and so on) and fit exactly one circumference with no adjustment. Stretch-fit caps use banded sizes such as youth, S/M, and L/XL, where an elastic sweatband flexes across a range. Adjustable caps — snapback, hook-and-loop, or elastic — collapse the whole question into a single one-size cap that spans roughly 56 to 59 cm on the adult version and less on youth cuts.
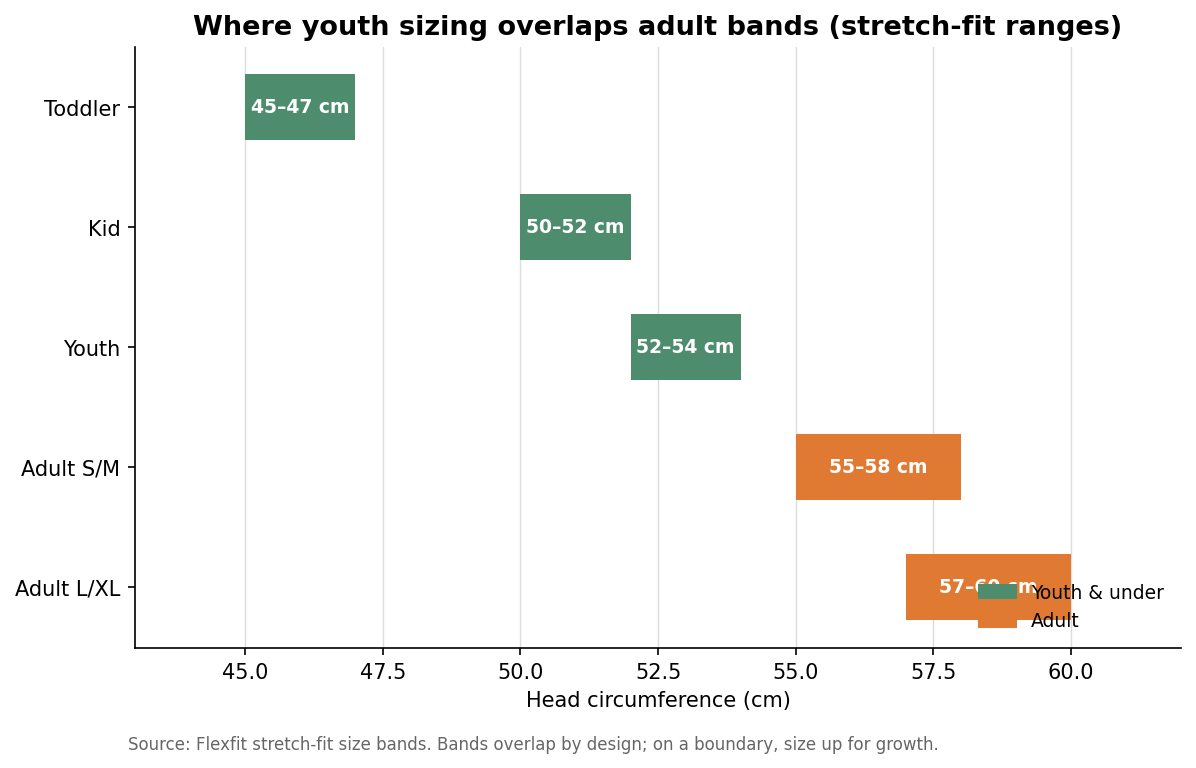
The bands overlap on purpose, which is why a child measuring 54 cm could reasonably wear a youth stretch cap or a small adult one. That overlap is your friend on a mixed-age roster: choosing an adjustable or stretch style lets you cover eight or ten different head sizes with two or three ordered sizes instead of a separate cap for every player. When a measurement lands right on a boundary, size up. Kids grow into a cap far more gracefully than they shrink into one, and a season is long enough that most of them will.
Closure decides how much fit error you can absorb
The closure is really a tolerance decision. A fitted cap has zero tolerance, so it demands an accurate measurement per player and leaves no room for a growth spurt. A snapback or hook-and-loop strap gives you a couple of inches of play, which forgives both measurement error and mid-season growth. Elastic stretch-fit sits in between, hugging a band without any hardware for younger kids who fidget with straps. For a youth team you are usually trading a perfect individual fit against the practicality of stocking fewer sizes, and adjustable styles almost always win that trade below the high-school level.
Crown structure and panel count
Structured crowns use a stiffened buckram backing behind the front panels, so the cap holds a tall, rounded shape and presents a flat, firm surface that embroidery sits on cleanly. Unstructured crowns — the softer, lower “dad cap” profile — slouch to the head and tend to be more comfortable for younger children, at the cost of a slightly less crisp logo area. Most baseball caps are six-panel with a center seam; a five-panel puts a single seamless panel across the front, which gives a larger uninterrupted space for a big logo. Profile height (low, mid, high) and a mesh trucker back are the other levers: mesh backs breathe well for summer ball, while a mid-profile structured six-panel is the safe default for a team look.
Specifying the custom order
Decoration comes after fit is settled. Flat embroidery is the most durable choice on cotton twill and reads well down to fairly small lettering; 3D puff embroidery lifts bold block letters off the crown for a varsity look; screen print, heat transfer, and woven or leather patches are alternatives worth pricing for larger or highly detailed art. Turning a logo into stitches (digitizing) is a one-time setup step, and the resulting stitch count is the main driver of both unit cost and production time. Minimum order quantities vary widely across the industry: some shops decorate a single cap, while bulk custom pricing commonly starts somewhere around 6 to 24 pieces. Turnaround for bulk embroidered caps is often in the range of one to three weeks after you approve the artwork, with rush options where available — treat those as typical rather than guaranteed and confirm the specific date in writing.
Two habits save the most grief. Ask for a digital proof or, better, a physical pre-production sample so you can check thread colors against the actual crown color before the full run stitches out. And order one or two spares in each size band for the inevitable lost or destroyed cap. Fit first, decoration second, and a spare in the bag — that is how a youth order still fits and still looks like a team in the last week of the season.